本次实验采用HBuilder+Xampp实现PHP+MYSQL代码编写
效果如下图所示

一、PHP程序编写
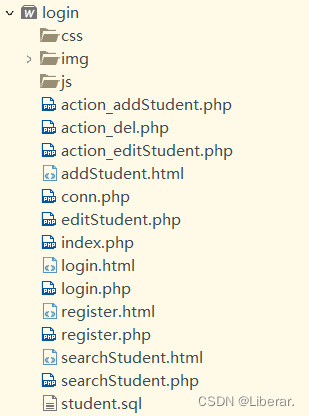
打开HBuider程序,新建文件夹login,文件目录如下:
1、新建login.html实现登录界面
<!DOCTYPE html>
<html>
<head>
<meta charset=”UTF-8″>
<title>注册登录</title>
</head>
<script language=JavaScript>
function InputCheck(){
var x = document.forms[“Login”][“username”].value;
if ( x == “” || x == null){
alert(“请输入用户名!”);
return (false);
}
var y= document.forms[“Login”][“password”].value;
if (y == “” || y == null){
alert(“请输入密码!”);
return (false);
}
}
function Regpage() {
location=’register.html’;
}
</script>
<body background=”img/背景1.jpg” style=”background-size: 100% 100%;background-attachment: fixed;”>
<header> <img src=”img/logo.png” ></header>
<div style=”position: absolute; left: 50%; top: 50%;width: 500px; margin-left:-250px; margin-top: -200px”>
<div style=”background: #eFeFeF; padding: 20px;border-radius: 4px;box-shadow: 5px 5px 20px #444444″ >
<div>
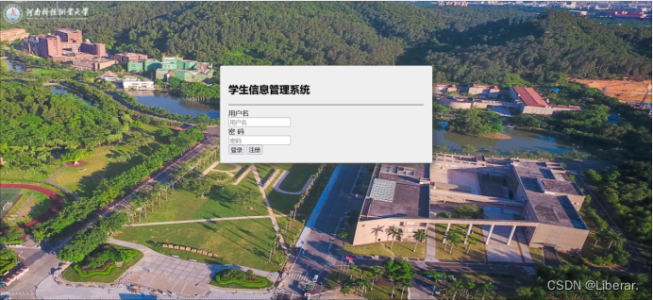
<form action=”login.php” method=”post” name=”Login” onsubmit=”return InputCheck()”>
<div style=”color: black”>
<h2>学生信息管理系统</h2>
</div>
<hr>
<div>
<label>用户名</label>
<div>
<input type=”text” name=”username” id=”username” placeholder=”用户名” autocomplete=”off”>
</div>
</div>
<div>
<label>密 码</label>
<div>
<input type=”password” name=”password” id=”password” placeholder=”密码” autocomplete=”off”>
</div>
</div>
<div>
<div>
<input type=”submit” value=”登录”>
<input type=”button” name=”register” id=”register” value=”注册” onclick=”Regpage()”>
</div>
</div>
</form>
</div>
</div>
</div>
</body>
</html>
2、新建login.php登录界面功能实现
<?php
//数据库连接
require(“conn.php”); //我把连接数据库的连接代码写在conn.php脚本上
//从登录页接受来的数据
$name=$_POST[“username”];
$pwd=$_POST[“password”];
$sql=”SELECT id,username,password FROM user WHERE username=’$name’ AND password=’$pwd’;”;
$result=mysqli_query($conn,$sql);
$row=mysqli_num_rows($result);
if(!$row){
echo “<script>alert(‘密码错误,请重新输入’);location=’login.html'</script>”;
}
else{
echo “<script>alert(‘登录成功’);location=’index.php'</script>”;
}
?>
3、新建register.html实现注册界面
<!DOCTYPE html>
<html>
<head>
<meta charset=”UTF-8″>
<title>注册页面</title>
</head>
<script>
function ResCheck() {
var x=document.forms[“Register”][“username”].value;
if ( x == “” || x == null){
alert(“用户名不能为空!”);
return (false);
}
var y= document.forms[“Register”][“password”].value;
if (y == “” || y == null){
alert(“密码不能为空!”);
return (false);
}
var z= document.forms[“Register”][“password2”].value;
if ( z!=y ) {
alert(“两次密码输入不一致,重新输入!”);
return (false);
}
}
</script>
<body background=”img/背景1.jpg” style=”background-size: 100% 100%;background-attachment: fixed;”>
<header> <img src=”img/logo.png” ></header>
<div style=”position: absolute; left: 50%; top: 50%;width: 500px; margin-left:-250px; margin-top: -200px”>
<div style=”background: #eFeFeF; padding: 20px;border-radius: 4px;box-shadow: 5px 5px 20px #444444″ >
<div>
<form action=”register.php” method=”post” name=”Register” onsubmit=”return ResCheck()”>
<div style=”color:black”>
<h2>用户注册</h2>
</div>
<div>
<label>用户名</label>
<div>
<input type=”text” name=”username” id=”username” placeholder=”用户名” autocomplete=”off”>
</div>
</div>
<br/>
<div>
<label>密码</label>
<div>
<input type=”password” name=”password” id=”password” placeholder=”密码” autocomplete=”off”>
</div>
</div>
<br/>
<div>
<label>确认密码</label>
<div>
<input type=”password” name=”password2″ id=”password2″ placeholder=”再次输入密码” autocomplete=”off”>
</div>
</div>
<br/>
<div>
<input type=”submit” value=”提交”>
</div>
</form>
</div>
</div>
</body>
</html>
4、新建register.php注册界面功能实现
<?php
//数据库连接
require(“conn.php”);
//从注册页接受来的数据
$user=$_POST[“username”];
$pwd=$_POST[“password”];
$sql=”INSERT INTO user (username,password) VALUES (‘$user’,’$pwd’)”;
$select=”SELECT username FROM user WHERE username=’$user'”;
$result=mysqli_query($conn,$select);
$row=mysqli_num_rows($result);
if(!$row){
if (mysqli_query($conn,$sql)){
echo “<script>alert(‘注册成功,请登录’);location=’login.html'</script>”;
}else{
echo “<script>alert(‘注册失败,请重新注册’);location=’regsiter.html'</script>”;
}
}else{
echo “<script>alert(‘该用户已经存在,请直接登录’);location=’login.html'</script>”;
}
?>

5、新建index.php注册界面功能实现
<?php
//连接数据库
include ‘conn.php’;
//编写查询sql语句
$sql = ‘SELECT * FROM `student`’;
//执行查询操作、处理结果集
$result = mysqli_query($link, $sql);
if (!$result) {
exit(‘查询sql语句执行失败。错误信息:’.mysqli_error($link)); // 获取错误信息
}
$data = mysqli_fetch_all($result, MYSQLI_ASSOC);
//编写查询数量sql语句
$sql = ‘SELECT COUNT(*) FROM `student`’;
//执行查询操作、处理结果集
$n = mysqli_query($link, $sql);
if (!$n) {
exit(‘查询数量sql语句执行失败。错误信息:’.mysqli_error($link)); // 获取错误信息
}
$num = mysqli_fetch_assoc($n);
//将一维数组的值转换为一个字符串
$num = implode($num);
?>
<html>
<head>
<meta charset=”UTF-8″>
<title>学生信息管理系统</title>
</head>
<style type=”text/css”>
body {
background-image: url(img/背景.jpg);
background-size: 100%;
}
.wrapper {
width: 1000px;
margin: 20px auto;
}
h1 {
text-align: center;
}
.add {
margin-bottom: 20px;
}
.add a {
text-decoration: none;
color: #fff;
background-color: #00CCFF;
padding: 6px;
border-radius: 5px;
}
td {
text-align: center;
}
</style>
<body>
<header> <img src=”img/logo.png” ></header>
<div class=”wrapper”>
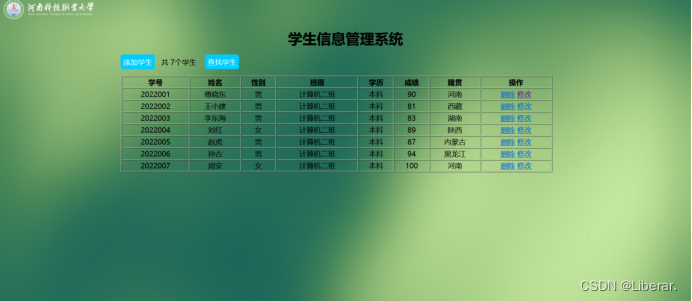
<h1>学生信息管理系统</h1>
<div class=”add”>
<a href=”addStudent.html”>添加学生</a> 共
<?php echo $num; ?>个学生
<a href=”searchStudent.html”>查找学生</a>
</div>
<table width=”960″ border=”1″>
<tr>
<th>学号</th>
<th>姓名</th>
<th>性别</th>
<th>班级</th>
<th>学历</th>
<th>成绩</th>
<th>籍贯</th>
<th>操作</th>
</tr>
<?php
foreach ($data as $key => $value) {
foreach ($value as $k => $v) {
$arr[$k] = $v;
}
echo “<tr>”;
echo “<td>{$arr[‘id’]}</td>”;
echo “<td>{$arr[‘name’]}</td>”;
echo “<td>{$arr[‘sex’]}</td>”;
echo “<td>{$arr[‘class’]}</td>”;
echo “<td>{$arr[‘edu’]}</td>”;
echo “<td>{$arr[‘grade’]}</td>”;
echo “<td>{$arr[‘city’]}</td>”;
echo “<td>
<a href=’javascript:del({$arr[‘id’]})’>删除</a>
<a href=’editStudent.php?id={$arr[‘id’]}’>修改</a>
</td>”;
echo “</tr>”;
// echo “<pre>”;
// print_r($arr);
// echo “</pre>”;
}
// 关闭连接
mysqli_close($link);
?>
</table>
</div>
<script type=”text/javascript”>
function del(id) {
if (confirm(“确定删除这个学生吗?”)) {
window.location = “action_del.php?id=” + id;
}
}
</script>
</body>
</html>
6、新建conn.php连接数据库
<?php
// 连接数据库、设置字符集
$link = mysqli_connect(‘localhost’, ‘root’, ”, ‘study’);
mysqli_set_charset($link, ‘utf8’);
?>
7、新建addStudent.html添加学生信息界面
<!doctype html>
<html>
<head>
<meta charset=”UTF-8″>
<title>学生信息管理系统</title>
<style type=”text/css”>
body {
background-image: url(img/背景.jpg);
background-size: 100%;
}
.box {
display: table;
margin: 0 auto;
}
h2 {
text-align: center;
}
.add {
margin-bottom: 20px;
}
</style>
</head>
<body>
<header> <img src=”img/logo.png” ></header>
<!–输出定制表单–>
<div class=”box”>
<h2>添加学生</h2>
<div class=”add”>
<form action=”action_addStudent.php” method=”post” enctype=”multipart/form-data”>
<table border=”1″>
<tr>
<th>学 号:</th>
<td><input type=”text” name=”id” size=”25″ value=””></td>
</tr>
<tr>
<th>姓 名:</th>
<td><input type=”text” name=”name” size=”25″ value=””></td>
</tr>
<tr>
<th>性 别:</th>
<td>
<label><input checked type=”radio” name=”sex” value=”男”>男</label>
<label><input type=”radio” name=”sex” value=”女”>女</label>
</td>
</tr>
<tr>
<th>班 级:</th>
<td><input type=”text” name=”class” size=”25″ value=””></td>
</tr>
<tr>
<th>学 历:</th>
<td>
<select name=”edu”>
<option selected value=””>–请选择–</option>
<option value=”研究生”>研究生</option>
<option value=”本科”>本科</option>
<option value=”专科”>专科</option>
<option value=”高中”>高中</option>
<option value=”初中”>初中</option>
</select>
</td>
</tr>
<tr>
<th>成 绩:</th>
<td><input type=”text” name=”grade” size=”25″ value=””></td>
</tr>
<tr>
<th>籍 贯:</th>
<td><input type=”text” name=”city” size=”25″ value=””></td>
</tr>
<tr>
<th></th>
<td>
<input type=”button” onClick=”javascript :history.back(-1);” value=”返回”>
<input type=”reset” value=”重置”>
<input type=”submit” value=”提交”>
</td>
</tr>
</table>
</form>
</div>
</div>
</body>
</html>
8、新建action_addStudent.php添加学生信息跳转
<?php
//连接数据库
include ‘conn.php’;
// 获取增加的学生信息
$id = $_POST[‘id’];
$name = $_POST[‘name’];
$sex = $_POST[‘sex’];
$class = $_POST[‘class’];
$edu = $_POST[‘edu’];
$grade = $_POST[‘grade’];
$city = $_POST[‘city’];
//编写预处理sql语句
$sql = “INSERT INTO `student` VALUES(?, ?, ?, ?, ?, ?, ?)”;
//预处理SQL模板
$stmt = mysqli_prepare($link, $sql);
// 参数绑定,并为已经绑定的变量赋值
mysqli_stmt_bind_param($stmt, ‘sssssss’, $id,$name, $sex, $class, $edu, $grade, $city);
if ($name) {
// 执行预处理(第1次执行)
$result = mysqli_stmt_execute($stmt);
//关闭连接
mysqli_close($link);
if ($result) {
//添加学生成功
//跳转到首页
header(“Location:index.php”);
}else{
exit(‘添加学生sql语句执行失败。错误信息:’ . mysqli_error($link));
}
}else{
//添加学生失败
//输出提示,跳转到首页
echo “添加学生失败!<br><br>”;
header(‘Refresh: 3; url=index.php’); //3s后跳转
}
9、新建action_del.php删除学生信息
<?php
//连接数据库
include ‘conn.php’;
$id = $_GET[‘id’];
//删除指定数据
//编写删除sql语句
$sql = “DELETE FROM student WHERE id={$id}”;
//执行查询操作、处理结果集
$result = mysqli_query($link, $sql);
if (!$result) {
exit(‘sql语句执行失败。错误信息:’.mysqli_error($link)); // 获取错误信息
}
// 删除完跳转到首页
header(“Location:index.php”);
10、新建action_editStudent.php修改学生信息
<?php
//连接数据库
include ‘conn.php’;
// 获取修改后的学生信息
$id = $_POST[‘id’];
$name = $_POST[‘name’];
$sex = $_POST[‘sex’];
$class = $_POST[‘class’];
$edu = $_POST[‘edu’];
$grade = $_POST[‘grade’];
$city = $_POST[‘city’];
//编写预处理sql语句
$sql = “UPDATE `student`
SET
`name`= ?,
`sex`= ?,
`class`= ?,
`edu`= ?,
`grade`= ?,
`city`= ?
WHERE `id`= ?”;
//预处理SQL模板
$stmt = mysqli_prepare($link, $sql);
// 参数绑定,并为已经绑定的变量赋值
mysqli_stmt_bind_param($stmt, ‘sssssss’, $name, $sex, $class, $edu, $grade, $city, $id);
if ($name) {
// 执行预处理(第1次执行)
$result = mysqli_stmt_execute($stmt);
//关闭连接
mysqli_close($link);
if ($result) {
//修改学生成功
//跳转到首页
header(“Location:index.php”);
}else{
exit(‘修改学生信息sql语句执行失败。错误信息:’ . mysqli_error($link));
}
}else{
//修改学生失败
//输出提示,跳转到首页
echo “修改学生失败!<br><br>”;
header(‘Refresh: 3; url=index.php’); //3s后跳转
}
11、新建editStudent.php添加学生信息界面
<?php
//连接数据库
include ‘conn.php’;
//获取id
$id = $_GET[‘id’];
//编写查询sql语句
$sql = “SELECT * FROM `student` WHERE `id`=$id”;
//执行查询操作、处理结果集
$result = mysqli_query($link, $sql);
if (!$result) {
exit(‘查询sql语句执行失败。错误信息:’.mysqli_error($link)); // 获取错误信息
}
$data = mysqli_fetch_all($result, MYSQLI_ASSOC);
//将二维数数组转化为一维数组
foreach ($data as $key => $value) {
foreach ($value as $k => $v) {
$arr[$k]=$v;
}
}
?>
<html>
<head>
<meta charset=”UTF-8″>
<title>学生信息管理系统</title>
<style type=”text/css”>
body {
background-image: url(img/背景.jpg);
background-size: 100%;
}
.box {
display: table;
margin: 0 auto;
}
h2 {
text-align: center;
}
.add {
margin-bottom: 20px;
}
</style>
</head>
<body background-image: url(img/背景.jpg);background-size: 100%;>
<header> <img src=”img/logo.png” ></header>
<!–输出定制表单–>
<div class=”box”>
<h2>修改学生信息</h2>
<div class=”add”>
<form action=”action_editStudent.php” method=”post” enctype=”multipart/form-data”>
<table border=”1″>
<tr>
<th>编 号:</th>
<td><input type=”text” name=”id” size=”5″ value=”<?php echo $arr[“id”] ?>” readonly=”readonly”></td>
</tr>
<tr>
<th>姓 名:</th>
<td><input type=”text” name=”name” size=”25″ value=”<?php echo $arr[“name”] ?>”></td>
</tr>
<tr>
<th>性 别:</th>
<td>
<label><input <?php if ($arr[“sex”]==”男” ) { echo “checked” ; } ?> type=”radio” name=”sex” value=”男”>男</label>
<label><input <?php if ($arr[“sex”]==”女” ) { echo “checked” ; } ?> type=”radio” name=”sex” value=”女”>女</label>
</td>
</tr>
<tr>
<th>班 级:</th>
<td><input type=”text” name=”class” size=”25″ value=”<?php echo $arr[“class”] ?>”></td>
</tr>
<tr>
<th>学 历:</th>
<td>
<select name=”edu”>
<option <?php if (!$arr[“edu”]) { echo “selected” ; } ?> value=””>–请选择–</option>
<option <?php if ($arr[“edu”]==”研究生” ) { echo “selected” ; } ?> value=”研究生”>研究生</option>
<option <?php if ($arr[“edu”]==”本科” ) { echo “selected” ; } ?> value=”本科”>本科</option>
<option <?php if ($arr[“edu”]==”专科” ) { echo “selected” ; } ?> value=”专科”>专科</option>
<option <?php if ($arr[“edu”]==”高中” ) { echo “selected” ; } ?> value=”高中”>高中</option>
<option <?php if ($arr[“edu”]==”初中” ) { echo “selected” ; } ?> value=”初中”>初中</option>
</select>
</td>
</tr>
<tr>
<th>成 绩:</th>
<td><input type=”text” name=”grade” size=”25″ value=”<?php echo $arr[“grade”] ?>”></td>
</tr>
<tr>
<th>籍 贯:</th>
<td><input type=”text” name=”city” size=”25″ value=”<?php echo $arr[“city”] ?>”></td>
</tr>
<tr>
<th></th>
<td>
<input type=”button” onClick=”javascript :history.back(-1);” value=”返回”>
<input type=”submit” value=”提交”>
</td>
</tr>
</table>
</form>
</div>
</div>
</body>
</html>
12、新建searchStudent.html查找学生信息界面
<!doctype html>
<html>
<head>
<meta charset=”UTF-8″>
<title>学生信息管理系统</title>
<style type=”text/css”>
body {
background-image: url(img/背景.jpg);
background-size: 100%;
}
.box {
display: table;
margin: 0 auto;
}
h2 {
text-align: center;
}
.add {
margin-bottom: 20px;
}
</style>
</head>
<body>
<header> <img src=”img/logo.png” ></header>
<!–输出定制表单–>
<div class=”box”>
<h2>查找学生</h2>
<div class=”add”>
<form action=”searchStudent.php” method=”get” enctype=”multipart/form-data”>
<table border=”1″>
<tr>
<th>学生编号:</th>
<td><input type=”text” name=”id” size=”25″ value=”” autofocus=”autofocus”></td>
</tr>
<tr>
<th></th>
<td>
<input type=”button” onClick=”javascript :history.back(-1);” value=”返回”>
<input type=”reset” value=”重置”>
<input type=”submit” value=”查找”>
</td>
</tr>
</table>
</form>
</div>
</div>
</body>
</html>
13、新建searchStudent.php查找学生信息功能实现
<?php
//连接数据库
include ‘conn.php’;
//获取id
$id = $_GET[‘id’];
//编写查询sql语句
$sql = “SELECT * FROM `student` WHERE `id`=$id”;
//执行查询操作、处理结果集
$result = mysqli_query($link, $sql);
if (!$result) {
exit(‘查询sql语句执行失败。错误信息:’.mysqli_error($link)); // 获取错误信息
}
$data = mysqli_fetch_all($result, MYSQLI_ASSOC);
if (!$data) {
//输出提示,跳转到首页
echo “没有这个学生!<br><br>”;
header(‘Refresh: 3; url=index.php’); //3s后跳转
exit();
}
//将二维数数组转化为一维数组
foreach ($data as $key => $value) {
foreach ($value as $k => $v) {
$arr[$k]=$v;
}
}
?>
<html>
<head>
<meta charset=”UTF-8″>
<title>学生信息管理系统</title>
<style type=”text/css”>
body {
background-image: url(1.jpg);
background-size: 100%;
}
.box {
display: table;
margin: 0 auto;
}
h2 {
text-align: center;
}
.add {
margin-bottom: 20px;
}
</style>
</head>
<body>
<!–输出定制表单–>
<div class=”box”>
<h2>查看学生信息</h2>
<div class=”add”>
<form action=”index.php” method=”post” enctype=”multipart/form-data”>
<table border=”1″>
<tr>
<th>编 号:</th>
<td><input type=”text” name=”id” size=”5″ value=”<?php echo $arr[“id”] ?>” readonly=”readonly”></td>
</tr>
<tr>
<th>姓 名:</th>
<td><input type=”text” name=”name” size=”25″ value=”<?php echo $arr[“name”] ?>” readonly=”readonly”></td>
</tr>
<tr>
<th>性 别:</th>
<td>
<label><input <?php if ($arr[“sex”]==”男” ) { echo “checked” ; } ?> type=”radio” name=”sex” value=”男” disabled=”disabled”>男</label>
<label><input <?php if ($arr[“sex”]==”女” ) { echo “checked” ; } ?> type=”radio” name=”sex” value=”女” disabled=”disabled”>女</label>
</td>
</tr>
<tr>
<th>班 级:</th>
<td><input type=”text” name=”class” size=”25″ value=”<?php echo $arr[“class”] ?>” readonly=”readonly”></td>
</tr>
<tr>
<th>学 历:</th>
<td>
<select name=”edu” disabled=”disabled”>
<option <?php if (!$arr[“edu”]) { echo “selected” ; } ?> value=””>–请选择–</option>
<option <?php if ($arr[“edu”]==”研究生” ) { echo “selected” ; } ?> value=”研究生”>研究生</option>
<option <?php if ($arr[“edu”]==”本科” ) { echo “selected” ; } ?> value=”本科”>本科</option>
<option <?php if ($arr[“edu”]==”专科” ) { echo “selected” ; } ?> value=”专科”>专科</option>
<option <?php if ($arr[“edu”]==”高中” ) { echo “selected” ; } ?> value=”高中”>高中</option>
<option <?php if ($arr[“edu”]==”初中” ) { echo “selected” ; } ?> value=”初中”>初中</option>
</select>
</td>
</tr>
<tr>
<th>成 绩:</th>
<td><input type=”text” name=”grade” size=”25″ value=”<?php echo $arr[“grade”] ?>” readonly=”readonly”></td>
</tr>
<tr>
<th>籍 贯:</th>
<td><input type=”text” name=”city” size=”25″ value=”<?php echo $arr[“city”] ?>” readonly=”readonly”></td>
</tr>
<tr>
<th></th>
<td>
<input type=”button” onClick=”javascript :history.back(-1);” value=”返回”>
<input type=”submit” value=”确定”>
</td>
</tr>
</table>
</form>
</div>
</div>
</body>
</html>
二、创建数据库
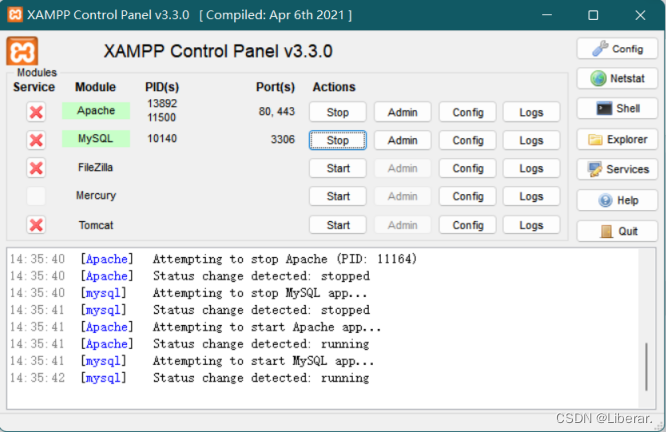
1、打开Xampp,如图
2、 单击“Admin进入数据库,创建regitlogin数据库,新建查询命令 ,按回车键执行导入命令
SET FOREIGN_KEY_CHECKS=0;
— —————————-
— Table structure for student
— —————————-
DROP TABLE IF EXISTS `student`;
CREATE TABLE `student` (
`id` int(10) NOT NULL AUTO_INCREMENT,
`name` varchar(32) DEFAULT NULL COMMENT ‘姓名’,
`sex` char(2) DEFAULT NULL COMMENT ‘性别’,
`class` varchar(6) DEFAULT NULL COMMENT ‘年龄’,
`edu` varchar(12) DEFAULT NULL COMMENT ‘学历’,
`grade` varchar(20) DEFAULT NULL,
`city` varchar(32) DEFAULT NULL COMMENT ‘籍贯’,
PRIMARY KEY (`id`)
) ENGINE=InnoDB AUTO_INCREMENT=171 DEFAULT CHARSET=utf8;
— —————————-
— Records
— —————————-
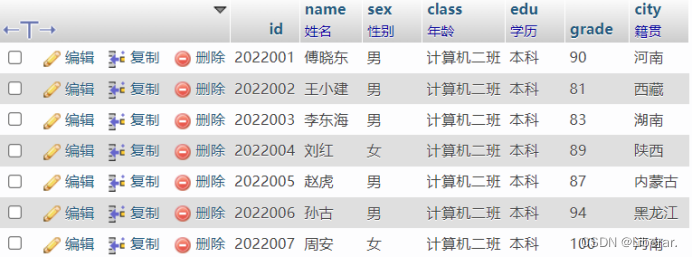
INSERT INTO `student` VALUES (‘2022001’, ‘傅晓东’, ‘男’, ‘计算机二班’, ‘本科’, ’90’, ‘河南’);
INSERT INTO `student` VALUES (‘2022002’, ‘王小健’, ‘男’, ‘计算机二班’, ‘本科’, ’81’, ‘西藏’);
3、在regitlogin数据库中建两个表,Student学生信息表
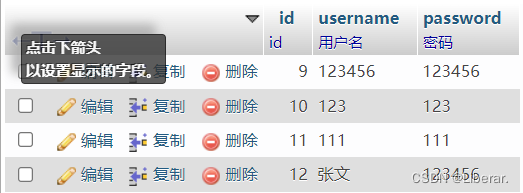
4、 User表存放登录者用户名和密码
三、 启动Xampp,在浏览器输入localhost/login.html,项目正确启动并运行了。
文章知识点与官方知识档案匹配,可进一步学习相关知识
MySQL入门技能树首页概览34536 人正在系统学习中
声明:本站所有资源,如无特殊说明或标注,均为本站原创发布。任何个人或组织,在未征得本站同意时,禁止复制、盗用、采集、发布本站内容到任何网站、书籍等各类媒体平台。如若本站内容侵犯了原著者的合法权益,可联系我们进行处理。