
一、前言
前面我们已经使用了 假数据去处理路由接口,并学习了开发博客路由相关 MySQL的基础知识。
下面我们就可以 整合改进 这两部分,实现 API 和 MySQL 的对接 工作。
二、Node.js 连接 MySQL
安装 MySQL
npm install mysql

在 src 目录下创建 ./conf/db.js 文件,用于连接数据库的配置

db.js 文件
- 线上环境与开发环境的配置是不一样的
- 这里写的是一样的,因为项目没有上线
// 获取环境参数, process 为 node.js 进程的一些信息
const env = process.env.NODE_ENV

// 配置
let MYSQL_CONF

// 开发环境下
if (env === 'dev') {
    MYSQL_CONF = {
        host: 'localhost',
        user: 'root',
        password: '1234abcd',
        port: '3306',
        database: 'myblog'
    }
}

// 线上环境下
if (env === 'production') {
    MYSQL_CONF = {
        host: 'localhost',
        user: 'root',
        password: '1234abcd',
        port: '3306',
        database: 'myblog'
    }
}

// 导出共享
module.exports = {
    MYSQL_CONF
}
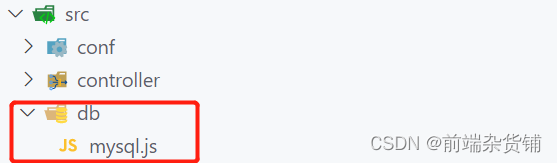
在 src 目录下创建 ./db/mysql.js 文件,用于存放一些数据
mysql.js 文件
- 引入 mysql 和连接数据库
- 封装 sql 函数,用于统一执行
// 引入 MySQL
const mysql = require('mysql')
// 引入数据库连接配置
const { MYSQL_CONF } = require('../conf/db')

// 创建连接对象
const con = mysql.createConnection(MYSQL_CONF)

// 开始连接
con.connect()

// 统一执行 sql 的函数
function exec(sql) {
    const promise = new Promise((resolve, reject) => {
        con.query(sql, (err, result) => {
            if (err) {
                reject(err)
                return
            }
            resolve(result)
        })
    })
    return promise
}

// 导出共享
module.exports = {
    exec
}
三、API 对接 MySQL
1、文件目录
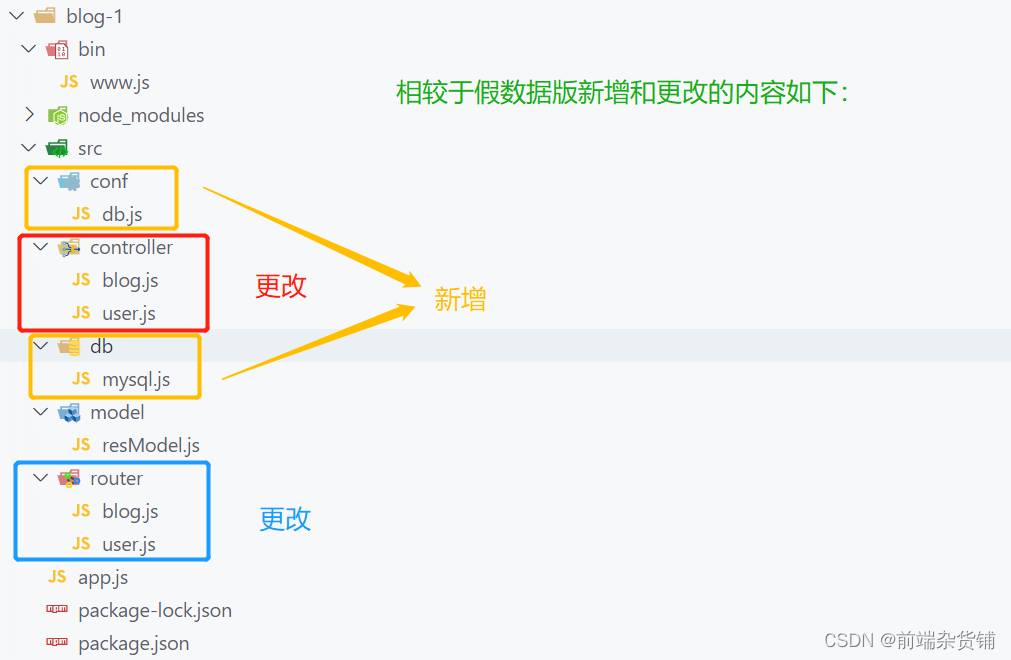
2、控制器_controller
blog.js 文件
- blog 相关 sql 逻辑
- 返回的是 promise 实例
// 导入执行 sql 的相关内容
const { exec } = require('../db/mysql')
// 获取博客列表(通过作者和关键字)
const getList = (author, keyword) => {
// 1=1 是为了语法的绝对正确,注意以下 sql 拼接时的空格
let sql = `select * from blogs where 1=1 `
if (author) {
sql += `and author='${author}' `
}
if (keyword) {
sql += `and title like '%${keyword}%' `
}
// 以时间的倒序
sql += `order by createtime desc;`
// 返回 promise
return exec(sql)
}
// 获取博客详情(通过 id)
const getDetail = (id) => {
const sql = `select * from blogs where id='${id}'`
return exec(sql).then(rows => {
// 返回数组的对象
return rows[0]
})
}
// 新建博客 newBlog 若没有,就给它一个空对象
const newBlog = (blogData = {}) => {
// blogData 是一个博客对象,包含 title content author 属性
const title = blogData.title
const content = blogData.content
const author = blogData.author
const createTime = Date.now()
// sql 插入语句
const sql = `
insert into blogs (title, content, createtime, author)
values ('${title}', '${content}', '${createTime}', '${author}');
`
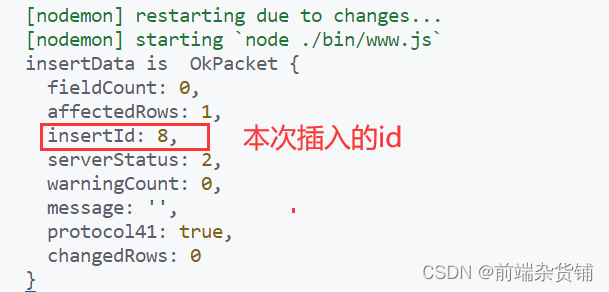
return exec(sql).then(insertData => {
console.log('insertData is ', insertData)
return {
id: insertData.insertId
}
})
}
// 更新博客(通过 id 更新)
const updateBlog = (id, blogData = {}) => {
// id 就是要更新博客的 id
// blogData 是一个博客对象 包含 title content 属性
const title = blogData.title
const content = blogData.content
const sql = `
update blogs set title='${title}', content='${content}' where id=${id}
`
return exec(sql).then(updateData => {
// console.log('updateData is ', updateData)
// 更新的影响行数大于 0,则返回 true
if (updateData.affectedRows > 0) {
return true
}
return false
})
}
// 删除博客(通过 id 删除)
const delBlog = (id, author) => {
const sql = `delete from blogs where id='${id}' and author='${author}'`
return exec(sql).then(delData => {
if (delData.affectedRows > 0) {
return true
}
return false
})
}
// 导出共享
module.exports = {
getList,
getDetail,
newBlog,
updateBlog,
delBlog
}
user.js 文件
- 登录相关 sql 逻辑
- 返回的是 promise 实例
const { exec } = require('../db/mysql')
// 登录(通过用户名和密码)
const loginCheck = (username, password) => {
    const sql = `
    	select username, realname from users where username='${username}' and password='${password}'
    `
    return exec(sql).then(rows => {
        return rows[0] || {}
    })
}

// 导出共享
module.exports = {
    loginCheck
}
3、路由_router
blog.js 文件
- 博客相关路由
- 调用控制器中的方法
// 导入博客和用户控制器相关内容
const { getList, getDetail, newBlog, updateBlog, delBlog } = require('../controller/blog')
// 导入成功和失败的模型
const { SuccessModel, ErrorModel } = require('../model/resModel')

// blog 相关路由
const handleBlogRouter = (req, res) => {
    const method = req.method // GET/POST
    const id = req.query.id // 获取 id

    // 获取博客列表 GET 请求
    if (method === 'GET' && req.path === '/api/blog/list') {
        // 博客的作者,req.query 用在 GET 请求中
        const author = req.query.author || ''
        // 博客的关键字
        const keyword = req.query.keyword || ''
        // 查询的结果
        const result = getList(author, keyword)
        return result.then(listData => {
            return new SuccessModel(listData)
        })
    }

    // 获取博客详情 GET 请求
    if (method === 'GET' && req.path === '/api/blog/detail') {
        // 获取博客详情数据
        const result = getDetail(id)
        // 创建并返回成功模型的 promise 实例对象
        return result.then(data => {
            return new SuccessModel(data)
        })
    }

    // 新建一篇博客 POST 请求
    if (method === 'POST' && req.path === '/api/blog/new') {
        // 假数据,待开发登录时再改成真实数据
        req.body.author = 'zhangsan'
        // req.body 用于获取请求中的数据(用在 POST 请求中)
        const result = newBlog(req.body)
        // 创建并返回成功模型的 promise 实例对象
        return result.then(data => {
            return new SuccessModel(data)
        })
    }

    // 更新一篇博客
    if (method === 'POST' && req.path === '/api/blog/update') {
        // 传递两个参数 id 和 req.body
        const result = updateBlog(id, req.body)
        return result.then(val => {
            if (val) {
                return new SuccessModel()
            } else {
                return new ErrorModel('更新博客失败')
            }
        })
    }

    // 删除一篇博客
    if (method === 'POST' && req.path === '/api/blog/del') {
        // 假数据,待开发登录时再改成真实数据
        const author = 'zhangsan'
        const result = delBlog(id, author)

        return result.then(val => {
            if (val) {
                return new SuccessModel()
            } else {
                return new ErrorModel('删除博客失败')
            }
        })
    }
}

// 导出
module.exports = handleBlogRouter
user.js 文件
- 用户登录相关路由
- 调用控制器中的方法
// 导入用户登录内容
const { loginCheck } = require('../controller/user')
// 导入成功和失败的模板
const { SuccessModel, ErrorModel } = require('../model/resModel')

// user 路由
const handleUserRouter = (req, res) => {
    const method = req.method

    // 登录
    if (method === 'POST' && req.path === '/api/user/login') {
        const { username, password } = req.body
        // 传入两个参数 用户名 密码
        const result = loginCheck(username, password)

        return result.then(data => {
            if (data.username) {
                return new SuccessModel()
            }
            return new ErrorModel('登录失败')
        })
    }
}

// 导出共享
module.exports = handleUserRouter
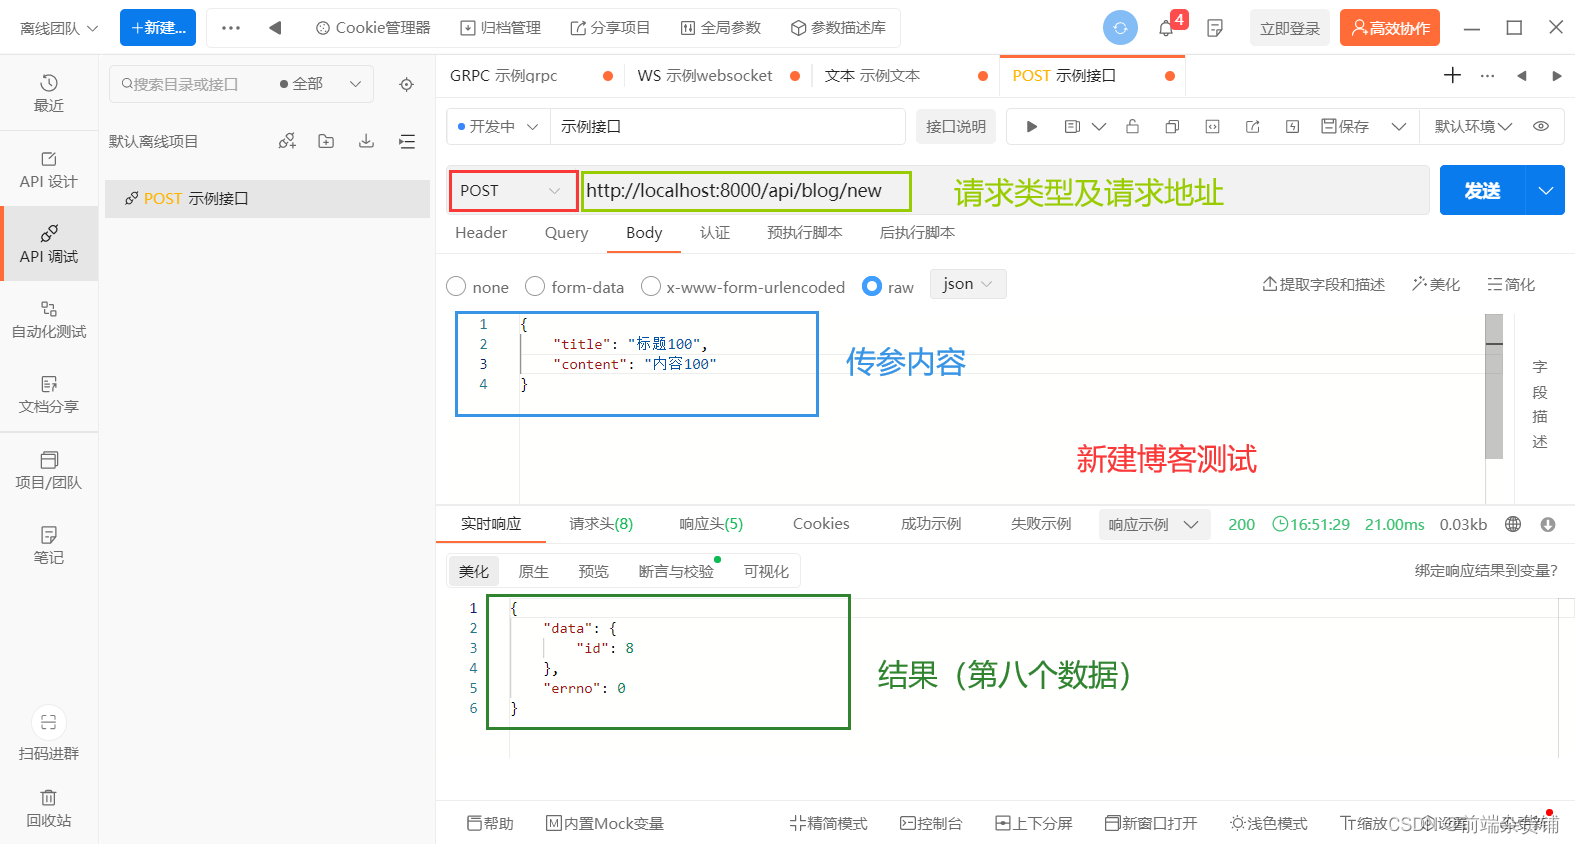
四、各个接口的测试
查询博客列表

通过关键字查询博客(模糊查询)

通过关键字查询博客(精准查询)

通过id获取博客详情

通过 ApiPost/Postman 工具测试 新建博客
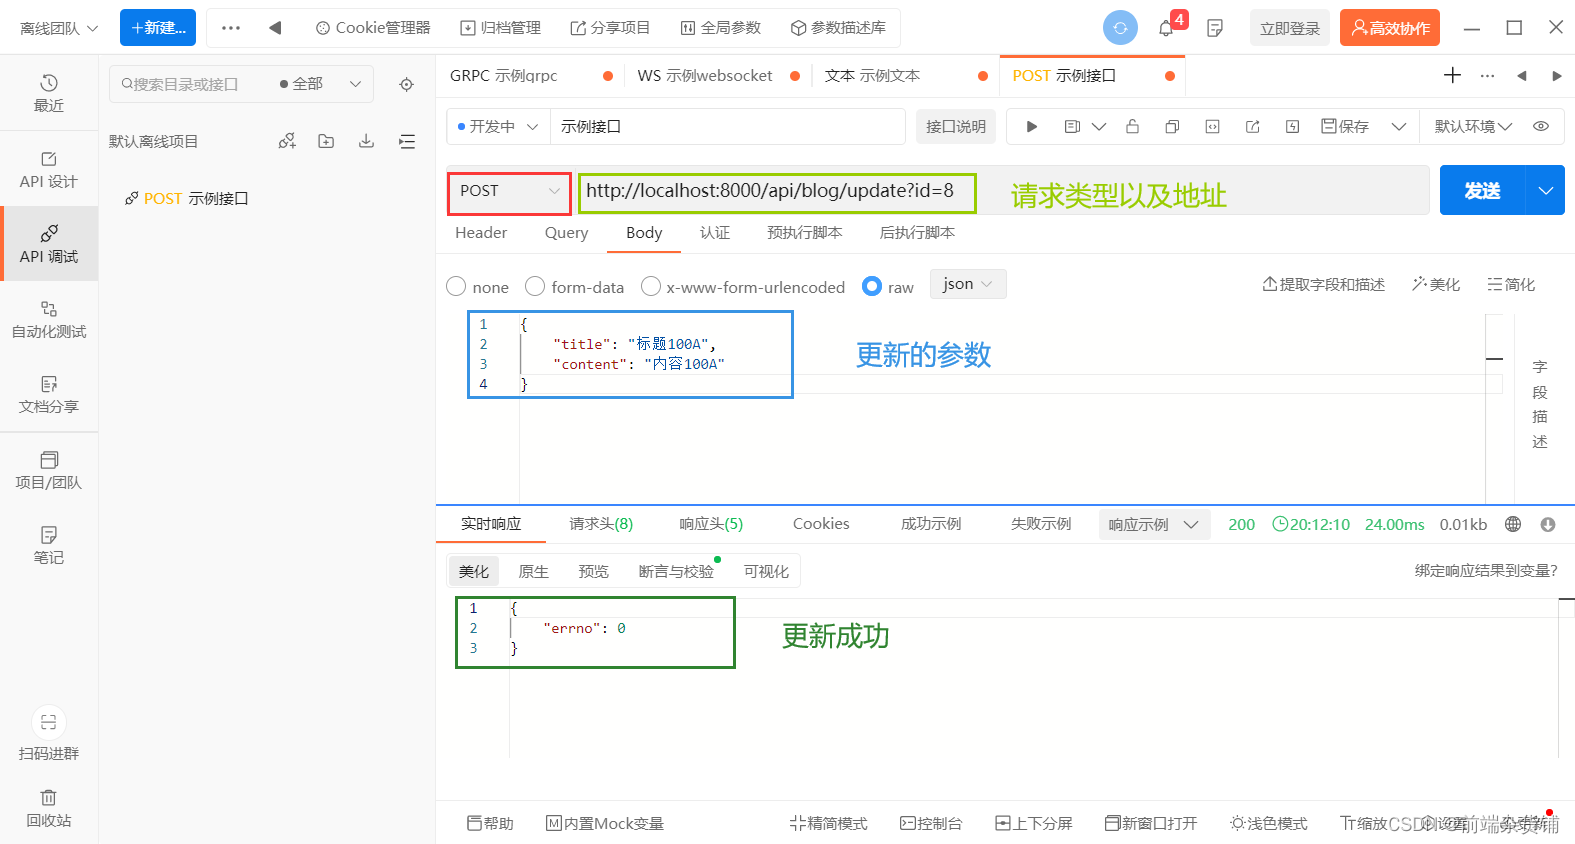
通过 ApiPost/Postman 工具测试 更新博客

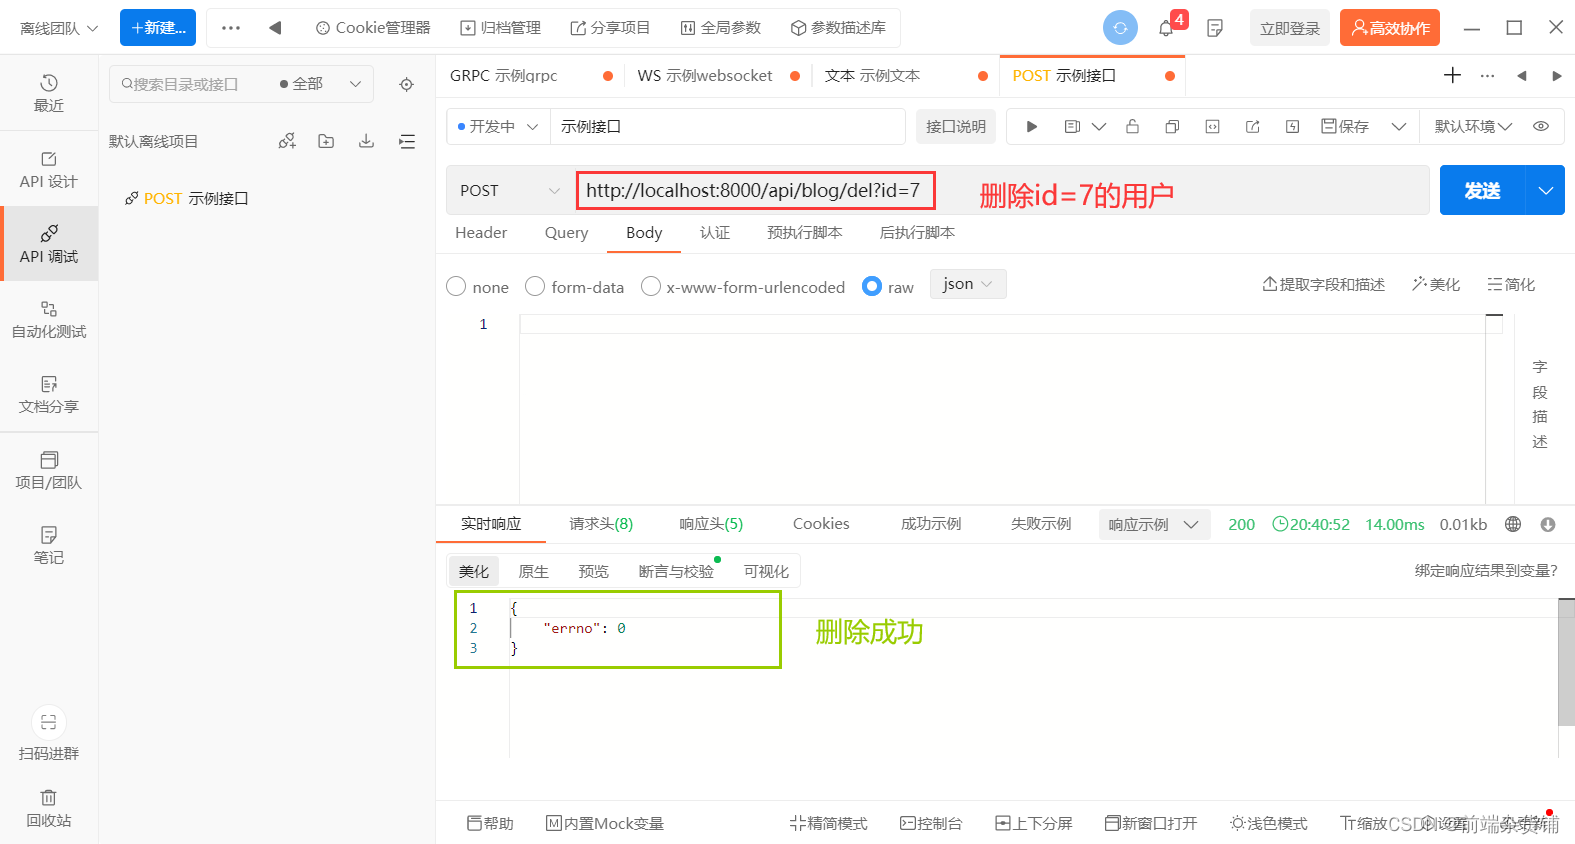
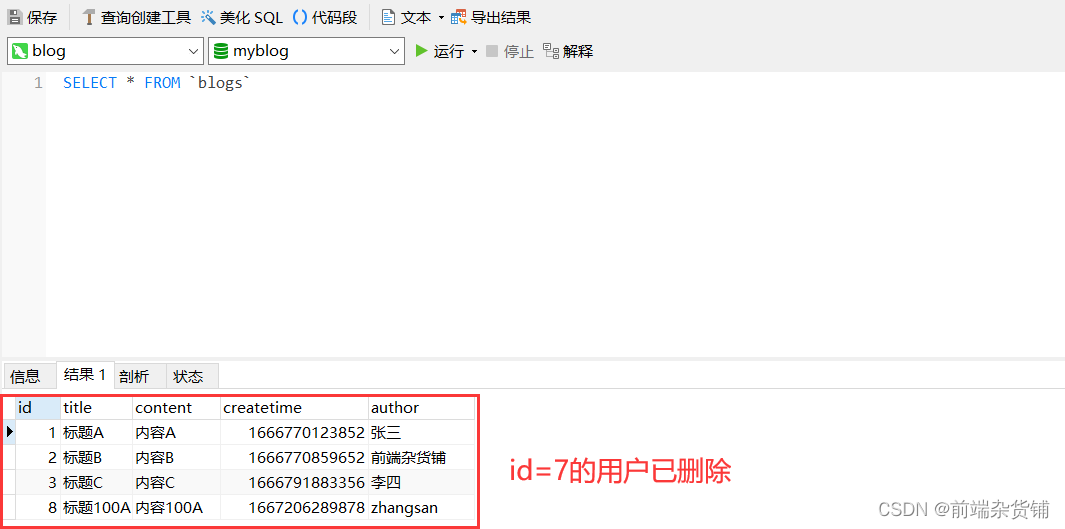
通过 ApiPost/Postman 工具测试 删除博客
通过 ApiPost/Postman 工具测试 登录

四、写在最后(附源码)
至此,开发博客的项目(API 对接 MySQL)就完成了。
后续会对该项目进行多次重构【多种框架(express,koa)和数据库(mysql,sequelize,mongodb)】
如果你需要该项目的 源码,请通过本篇文章最下面的方式 加入 进来~~
.png)
声明:本站所有资源,如无特殊说明或标注,均为本站原创发布。任何个人或组织,在未征得本站同意时,禁止复制、盗用、采集、发布本站内容到任何网站、书籍等各类媒体平台。如若本站内容侵犯了原著者的合法权益,可联系我们进行处理。
![12个例⼦带你⼊门Electron[8000字附源码]](https://www.jwee.net/wp-content/themes/ripro-v2/assets/img/thumb.jpg)